
We may receive a commission on purchases made from links.
You may already know that the letters “RV” stand for recreational vehicle. The recreational vehicle class includes drivable and towable campers like motorhomes, fifth wheels, and travel trailers. Of course, each of these RV types includes various subtypes to accommodate a variety of camping and travel styles.
The differences among RV electrical systems are among the first things you should consider when buying or using an RV. Some are wired for 30-amp plugs, while others are wired for 50-amp plugs. An easy way to determine which type of plug your RV has is to look at the end of the power cord that plugs into the electrical source, such as a campground or RV park pedestal.
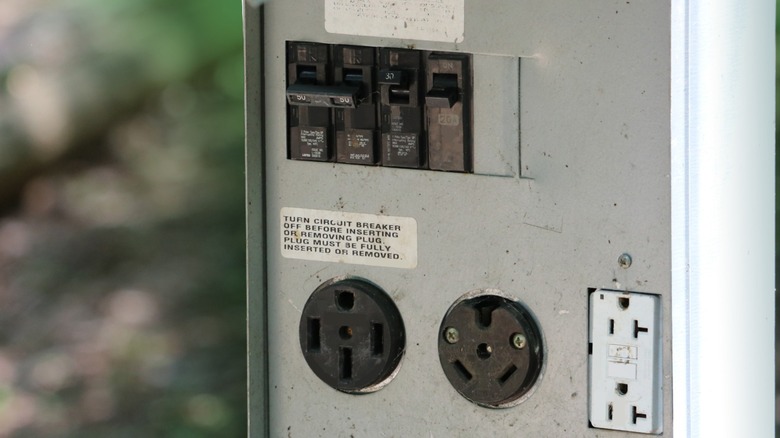
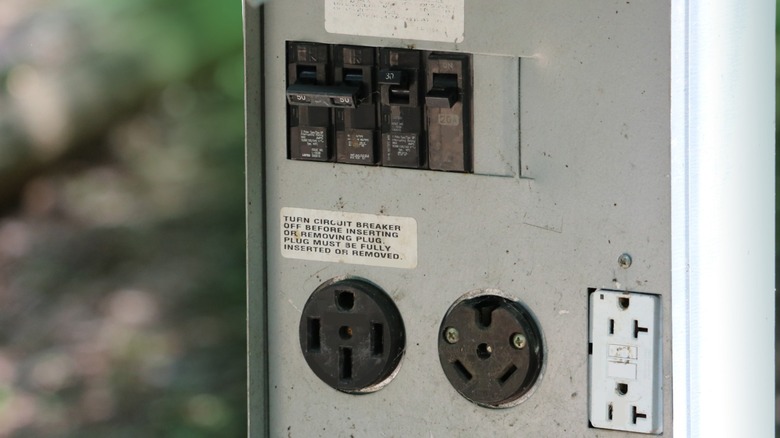
If your RV is wired for 30-amp electrical service, you’ll see three prongs, one round post, and two flat blades. RV plugs intended for 50-amp service have an additional flat blade for a total of four prongs. In the picture above (showing a common RV park electrical pedestal), the black receptacle on the left provides 50-amp service, the middle receptacle is 30-amp, and the more standard outlet on the right provides up to 20-amp electrical output.
Is it okay to plug a 30-amp RV into a 50-amp outlet?

Yes, provided you use an adapter that allows plugging a 30-amp RV into a 50-amp receptacle. Full disclosure: I am using one for power to write this article. While it might seem like a hack to tap into bonus power, the adapter doesn’t provide the RV with more power than its designed 30-amp capacity.
In addition, you might need an adapter if you plan to hook up your RV to a generator when boondocking, or camping off-grid. Mooch-docking, or staying in your RV close to the home of friends or family and connecting to their utilities, is another common situation where electrical adapters come in handy. It’s always a good idea to carry a few adapters, often known as “dog-bones,” for various situations while traveling.
There are also times when RVers with 50-amp electrical systems could need to use a dog-bone to plug their 50-amp RV into a 30-amp outlet. While plugging a 30-amp RV adapter into a 50-amp receptacle provides a full 30-amp power supply, connecting a 50-amp RV to a 30-amp supply drastically reduces the available power.
The math is simple: watts equals volts x amps. A 30-amp, 120V electrical plug provides up to 3,600 watts. That much power can support the RV’s air conditioner, a hair dryer, a microwave, and a coffee maker, but not all at the same time.
On the other hand, a 50-amp RV operates on two separate 120V “lines,” each with 50 amps of capacity. Each line (L1 and L2) provides 6,000 watts, for a total of 12,000 watts, as long as the loads are evenly distributed across the RV circuits. However, plugging the 50-amp cord into a 30-amp outlet reduces the available power to 3,600 watts.
Are there any downsides to upgrading to a 50-amp plug?

The increased available power is an obvious upside of upgrading to an RV with a 50-amp plug. In addition, 50-amp RVs are typically larger, have more than one air conditioner, and often have electric fireplaces. The most obvious downside to buying a 50-amp RV is the increased purchase price compared to the typical 30-amp RV.
While it’s possible to upgrade an RV from 30-amp to 50-amp service, it’s not as simple as just changing the plug, or even the entire power cable. It requires changing the power distribution system and rewiring much of the RV. Rewiring an RV should only be attempted by an electrician who is well-versed in RV electrical systems. A project like that would be complex, expensive, and likely not qualify as an affordable way to upgrade your RV before your next trip.
Another downside to 50-amp RV plugs is the heavy power cable they require. Electrical cords designed to carry higher amperages use thicker copper wire than their lower-amperage counterparts. This not only makes them heavier, but it also makes the 50-amp power cable stiffer and more difficult to pack into an RV storage compartment.

Stephan is the sports journalist for the Maple Grove Report.